Powered by Modern Robotics

0 $0.00

Cart

No products in the cart.
Shop

HiTechnic NXT Touch Sensor Multiplexer

$14.95

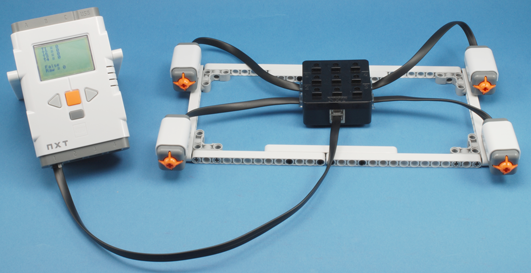
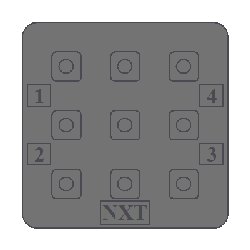
Connect up to 4 standard NXT Touch Sensors to one sensor port with the Touch Sensor Multiplexer. The HiTechnic Touch Sensor Multiplexer has 4 input ports where NXT Touch Sensors can be attached and a single output port to connect to the NXT. The state of each Touch Sensor can be read independently and a single read can determine the state of each touch sensor.

Out of stock

Join the waitlist to be emailed when this product becomes available

SKU: NTX1060 Category:

Description

HiTechnic NXT Touch Sensor Multiplexer for LEGO Mindstorms NXT

Introduction

The NXT Touch Sensor Multiplexer allows up to 4 touch sensors to be connected to a single NXT sensor port. An NXT program can read the state of each touch sensor or the state of all 4 touch sensors with a single read command.

Programming

Mindstorms NXT-G

This block checks each of the touch sensors connected to the Touch Sensor Multiplexer and sends out its result as logic signals (true or false) through data wires. If a touch sensor has been triggered, the block will send out a true signal; if it has not been triggered, the block will send a false signal. Use the radio buttons to decide which state each touch sensor or switch has to be in to produce an overall logic “true” signal.

You must drag at least one output data wire from this block’s data hub to another block for any information to be sent.

The term Multiplexer is often shortened to “MUX”.

Note: The Touch Sensor MUX only works with Touch Sensors. If other types of sensors are plugged into the Touch MUX they will not operate.

Display Settings
  1. The number shows which NXT port is connected to the Touch Sensor Multiplexer. You can change this number in the configuration panel if you need to.
  2. The block’s data hub will open automatically when the block is placed in the work area. At least one data wire must be dragged from the block’s output plug to another block’s data hub. (See the Data Hub section below for more information.)
Configuring the Touch Sensor Multiplexer Block
  1. Choose the NXT port your Touch MUX is plugged into. By default, the block will be set to port 2 for a Touch Sensor Multiplexer. You can change this selection if you need to.
  2. Select the desired combination of Touch Sensor inputs that will be combined to create the overall logic output. In the default state, all four Touch Sensors must be triggered to create an overall true output. If a Touch Sensor input is not needed to contribute toward the overall logic output, then Ignore should be selected. If a Touch Sensor input is needed but in the untriggered state to contribute toward the overall logic output, then False should be selected.

For example, with the setting shown in the following front panel, the overall logic output will be set to True when

Touch Sensor 1 is pressed (True)
and
Touch Sensor 2 is not pressed (False)
and
Touch Sensor 3 is pressed (True)
and
Touch Sensor 4 is ignored (don’t care if it is pressed or not)

Touch MUX block Data Hub plugs

The connections to the Touch Sensor Multiplexer are mechanically configured as follows:

The connector identified by the “NXT” label should be wired to the desired NXT sensor port.

Up to four Touch Sensors can be wired to the connectors labeled 1 – 4.

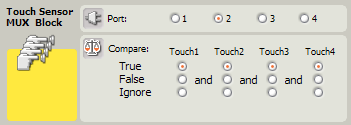
This chart shows the different characteristics of the plugs on the Touch MUX block’s data hub:


Plug

Data Type

Possible Range

What the Values Mean

Port

Number

1 – 4

1 = Port 1, 2 = Port 2, 3 = Port 3, 4 = Port 4

Switch1

Logic

True/False

True = Touch Sensor pressed
False = Touch Sensor not pressed

Switch2

Logic

True/False

True = Touch Sensor pressed
False = Touch Sensor not pressed

Switch3

Logic

True/False

True = Touch Sensor pressed
False = Touch Sensor not pressed

Switch4

Logic

True/False

True = Touch Sensor pressed
False = Touch Sensor not pressed

Raw Value

Number

0 – 15

Raw (unscaled) value from the Touch MUX

Yes / No

Logic

True/False

Compare table result

Entry1

Number

0 – 2

Switch 1 Compare entry
0=Select True, 1=Select False, 2 = Select Ignore

Entry2

Number

0 – 2

Switch 2 Compare entry
0=Select True, 1=Select False, 2 = Select Ignore

Entry3

Number

0 – 2

Switch 2 Compare entry
0=Select True, 1=Select False, 2 = Select Ignore

Entry4

Number

0 – 2

Switch 2 Compare entry
0=Select True, 1=Select False, 2 = Select Ignore

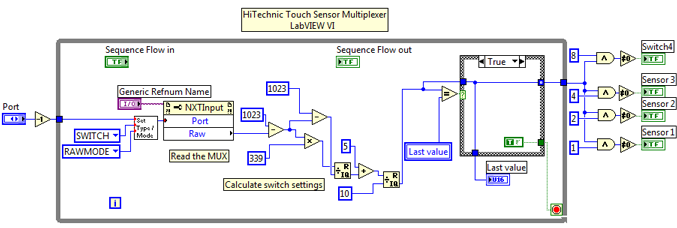
To decode the touch sensor status based on the raw sensor value, here is the code fragment:

SetSensorType(S1, SENSOR_TYPE_LIGHT);
long value, switches;
bool switch1,switch2,switch3,switch4;
value=1023-SensorRaw(S1);
switches=339*value;
switches/=1023-value;
switches+=5;
switches/=10;
if(switches&8) switch4=1; else switch4=0;
if(switches&4) switch3=1; else switch3=0;
if(switches&2) switch2=1; else switch2=0;
if(switches&1) switch1=1; else switch1=0;

Other Programming Enviornments

NXC
The Touch Sensor Multiplexer can be read in an NXC program using the function ReadSensorHTTouchMultiplexer. Here is a complete sample program:
//============================================================
// HiTechnic sample program for the T-MUX
//
// This program uses the function ReadSensorHTTouchMultiplexer
// to get the state of the touch sensors attached to the T-MUX.
#define PORT_TMUX IN_1
task main()
{
  bool t1,t2,t3,t4;
  
  SetSensorType(PORT_TMUX, IN_TYPE_LIGHT_INACTIVE);
  TextOut(0, LCD_LINE1, "HiTechnic");
  TextOut(0, LCD_LINE2, "  TMUX Viewer");

  while(true) {
    ReadSensorHTTouchMultiplexer(PORT_TMUX, t1, t2, t3, t4);
    TextOut(0, LCD_LINE5, "                "); // Erase line
    if (t1) TextOut(6,    LCD_LINE5, "T1");
    if (t2) TextOut(6*5,  LCD_LINE5, "T2");
    if (t3) TextOut(6*9,  LCD_LINE5, "T3");
    if (t4) TextOut(6*13, LCD_LINE5, "T4");
    Wait(10);
  }
}
More information regarding NXC is available at http://bricxcc.sourceforge.net/nbc/.
LabVIEW Toolkit vi

The Touch Sensor Multiplexer is supported by the NXT LabVIEW Toolkit. A vi is available for download from the Download page.

More information on LabView for MINDSTORMS is available at http://www.ni.com/academic/mindstorms/

RobotC
task main()
{
SensorType[S3] = sensorHiTechnicTouchMux; // Configure the sensor.

while (true)
{
int nButtonsMask;

//
// The sensor value is a 4-bit map indicating which of the possible four
// touch sensors are pressed.
//
nButtonsMask = SensorValue[S3];

if (nButtonsMask & 0x01)
nxtDisplayTextLine(1, "Btn 1: Pressed");
else
nxtDisplayTextLine(1, "Btn 1:");

if (nButtonsMask & 0x02)
nxtDisplayTextLine(2, "Btn 2: Pressed");
else
nxtDisplayTextLine(2, "Btn 2:");

if (nButtonsMask & 0x04)
nxtDisplayTextLine(3, "Btn 3: Pressed");
else
nxtDisplayTextLine(3, "Btn 3:");

if (nButtonsMask & 0x08)
nxtDisplayTextLine(4, "Btn 4: Pressed");
else
nxtDisplayTextLine(4, "Btn 4:");
wait1Msec(100);
}
}

For more information go to http://www.robotc.net/content/lego_over/lego_over.html.

Additional information

Weight .0990 lbs
Dimensions 3 × 4.5 × 1.5 in

Robot C

The RobotC driver suite supports HiTechnic products for RobotC 4.x and RobotC 3.x. Select the corresponding repository at the link below and download the zip file.

https://github.com/botbench

Downloads

No downloads found!